Objective of this article is to provide insight & an idea on how to design SolrCloud Cluster (Single Collection) deployment. I recommend you to check out an post SolrCloud (aka Apache Solr) to know Solr Distributed Terminology, Bird Eye: SolrCloud vs Classic Solr, Articles and upcoming Articles.
- Designing SolrCloud Collection
- ZooKeeper ensemble Deployment
- Handy SolrCloud ZkCLI Commands
- Creating Solr Configuration schema.xml, solrconfig.xml, etc
- Uploading Solr Configuration into ZooKeeper ensemble
- Deploying SolrCloud in Tomcat 7
- Creating Collection, Shard(s), Replica(s) in SolrCloud
- Let’s Perform few documents indexing
- Exploring Newly Created SolrCloud Cluster Availability
- Your Journey Starts Here!
Designing SolrCloud Collection
Design phase is considered to be a vital & crucial phase of the project. We are going to execute the following design plan for designing SolrCloud cluster. Collection & Shard are logical elements in the SolrCloud cluster, multiple Solr core(s) collective brings SolrCloud formation. Underneath it just a physical Solr Core.
- Creation of single SolrCloud collection named europe-collection in Europe Data Center
- ZooKeeper ensemble with 5 replicated ZooKeeper server(s)
- 3 Node(s) of SolrCloud Instance(s) with replication factor 3
- 3 Shard(s) distributed among 3 SolrCloud Instance(s)
- Manual distribution of Shard replica(s) among 3 Shard(s) on 3 Node(s)
Technical Elements:
- Apache Tomcat 7.0.x (same steps applies other version too)
- Apache ZooKeeper 3.3.x
- Apache Solr 4.x
Directory structures are –
Data Center is represented as
/Users/jeeva/dc-1

Solr home for respective Solr Node(s)
/Users/jeeva/dc-1/solr/home1
/Users/jeeva/dc-1/solr/home2
/Users/jeeva/dc-1/solr/home3

Tomcat 7 home for respective Solr Node(s)
/Users/jeeva/dc-1/tomcat1
/Users/jeeva/dc-1/tomcat2
/Users/jeeva/dc-1/tomcat3

SolrCloud Configuration Directory
/Users/jeeva/dc-1/config-files

Solr Zk CLI [Command Line Interface] Libraries
/Users/jeeva/dc-1/solr-cli-lib
The described design has been represented in below diagram:

ZooKeeper Ensemble Deployment
Check out an article ZooKeeper Cluster (Multi-Server) Setup to get acquaintance with the steps to deploy a ZooKeeper ensemble. Go ahead and deploy ZooKeeper server(s).
Handy SolrCloud ZkCLI Commands
SolrCloud comes with really handy ZooKeeper CLI commands for upload, download, linking configuration set to Collection. Let’s prepare, it’s very simple. All you have to do is
- Extract the apache-solr-4.x.x.war
- Get all the jar(s) from lib directory and place it in local directory
Let’s perform these steps:
Download Apache Solr 4 artifact to tmp directory
$ curl -o /tmp/apache-solr-4.x.x.zip http://apache.techartifact.com/mirror/lucene/solr/4.x.x/apache-solr-4.x.x.zip
Extract zip file and war file in to tmp directory
$ unzip -q /tmp/apache-solr-4.x.x.zip -d /tmp/
$ unzip -q /tmp/apache-solr-4.x.x/dist/apache-solr-4.x.x.war -d /tmp/solr-war
Create a directory and copy it over there
$ mkdir -p /Users/jeeva/dc-1/solr-cli-lib
$ cp /tmp/solr-war/WEB-INF/lib/* /Users/jeeva/dc-1/solr-cli-lib/
Copying Logger libraries to solr-cli-lib [this step is applicable only to Solr 4.3 & above]
$ cp /tmp/apache-solr-4.x.x/example/lib/ext/* /Users/jeeva/dc-1/solr-cli-lib/
Now, we are ready to take advantage SolrCloud ZooKeeper CLI handy commands in sub sequent article sections.
Creating Solr Configuration schema.xml, solrconfig.xml, etc
Every organization is unique and has its own requirement and hence create Solr configuration files adhering to the unique business requirements of the the organization. Of-course every Solr deployment is unique in nature around the world with its schema (fields and data structure), solrconfig (analyzers, tokenizers, etc), stopwords, Boosting & Blocking, synonyms, etc.
Create your own solr configurations and place it in a directory. For this article I’m planning to use example configuration shipped with Solr 4 artifacts.
$ mkdir -p /Users/jeeva/dc-1/config-files

$ cp -r /tmp/apache-solr-4.x.x/example/solr/collection1/conf/* /Users/jeeva/dc-1/config-files
Listing out copied Solr configuration
$ ls -lGFh /Users/jeeva/dc-1/config-files
Uploading Solr Configuration into ZooKeeper ensemble
We have already prepared the required Solr CLI libs so let us use it now. Listing down the points that we should be aware of –
- ZooKeeper host addresses and client port numbers for zkhost param
- Solr Configuration directory for confdir param
- Configuration name in the ZooKeeper binding, let’s say myconf
Uploading a Solr Configuration
$ java -classpath .:/Users/jeeva/dc-1/solr-cli-lib/* org.apache.solr.cloud.ZkCLI -cmd upconfig -zkhost localhost:2181,localhost:2182,localhost:2183,localhost:2184,localhost:2185 -confdir /Users/jeeva/dc-1/config-files -confname myconf
Linking Uploaded Solr configuration with collection
$ java -classpath .:/Users/jeeva/dc-1/solr-cli-lib/* org.apache.solr.cloud.ZkCLI -cmd linkconfig -collection europe-collection -confname myconf -zkhost localhost:2181,localhost:2182,localhost:2183,localhost:2184,localhost:2185
We have uploaded and linked solr configuration, lets verify it.
Connecting to ZooKeeper (we have five servers, let’s connect to one among the 5 servers)
cd /Users/jeeva/zookeeper/zk-server-1/bin
mac-book-pro:bin jeeva$ ./zkCli.sh -server localhost:2181

Connecting to localhost:2181
2012-10-21 17:41:01,792 [myid:] - INFO  [main:Environment@100] - Client environment:zookeeper.version=3.4.4-1386507, built on 09/17/2012 08:33 GMT
....
....
....
[zk: localhost:2181(CONNECTED) 0]
Querying uploaded configuration and collection path in ZooKeeper
[zk: localhost:2181(CONNECTED) 1] ls /
[configs, collections, zookeeper]

[zk: localhost:2181(CONNECTED) 2] ls /configs
[myconf]

[zk: localhost:2181(CONNECTED) 3] ls /configs/myconf
[admin-extra.menu-top.html, currency.xml, protwords.txt, mapping-FoldToASCII.txt, solrconfig.xml, stopwords.txt, lang, spellings.txt, mapping-ISOLatin1Accent.txt, admin-extra.html, xslt, synonyms.txt, scripts.conf, update-script.js, velocity, elevate.xml, admin-extra.menu-bottom.html, schema.xml]

[zk: localhost:2181(CONNECTED) 4] ls /collections
[europe-collection]

[zk: localhost:2181(CONNECTED) 5]
Looks good move on!
Deploying SolrCloud in Tomcat
In this section we will be setting up tomcat instance(s) and SolrCloud Cluster. It would take more number of steps to understand the SolrCloud cluster deployment. I’m going to describe those steps in simplified way. Stay with me!
Step 1
Directory Structure creation for our deployment
$ mkdir -p /Users/jeeva/dc-1/{tomcat1,tomcat2,tomcat3}

$ mkdir -p /Users/jeeva/dc-1/solr/{home1,home2,home3}
Step 2
Downloading Tomcat 7 & Solr 4 artifacts
$ curl -o /tmp/apache-tomcat-7.0.32.zip http://apache.techartifact.com/mirror/tomcat/tomcat-7/v7.0.32/bin/apache-tomcat-7.0.32.zip

$ curl -o /tmp/apache-solr-4.x.x.zip http://apache.techartifact.com/mirror/lucene/solr/4.x.x/apache-solr-4.x.x.zip
Step 3
Extracting downloaded artifacts and place it in respective directories
$ unzip -q /tmp/apache-tomcat-7.0.32.zip -d /tmp/
$ unzip -q /tmp/apache-solr-4.x.x.zip -d /tmp/

$ cp -r /tmp/apache-tomcat-7.0.32/* /Users/jeeva/dc-1/tomcat1/
$ cp -r /tmp/apache-tomcat-7.0.32/* /Users/jeeva/dc-1/tomcat2/
$ cp -r /tmp/apache-tomcat-7.0.32/* /Users/jeeva/dc-1/tomcat3/

$ cp /tmp/apache-solr-4.x.x/dist/apache-solr-4.x.x.war /Users/jeeva/dc-1/tomcat1/webapps/solr.war
$ cp /tmp/apache-solr-4.x.x/dist/apache-solr-4.x.x.war /Users/jeeva/dc-1/tomcat2/webapps/solr.war
$ cp /tmp/apache-solr-4.x.x/dist/apache-solr-4.x.x.war /Users/jeeva/dc-1/tomcat3/webapps/solr.war

# Copying Logger libraries to Tomcat lib directory [this is applicable to Solr 4.3 and above]
$ cp /tmp/apache-solr-4.x.x/example/lib/ext/* /Users/jeeva/dc-1/tomcat1/lib/
$ cp /tmp/apache-solr-4.x.x/example/lib/ext/* /Users/jeeva/dc-1/tomcat2/lib/
$ cp /tmp/apache-solr-4.x.x/example/lib/ext/* /Users/jeeva/dc-1/tomcat3/lib/
Step 4
Creating a setenv.sh for respective tomcat(s) serves for our customization. I’m describing for one tomcat instance and similarly follow the same steps for other two tomcat servers with appropriate values (Solr home, app server port no.)
$ vi /Users/jeeva/dc-1/tomcat1/bin/setenv.sh
And place the following configuration snippet in it and FORGET NOT to save setenv.sh
#!/bin/sh
# author: Jeevanandam M. - [email protected]

JAVA_HOME=$(/usr/libexec/java_home)

# run JVM in server mode
JAVA_OPTS="$JAVA_OPTS -server"

# memory
JAVA_OPTS="$JAVA_OPTS -Xms128m -Xmx2048m"
JAVA_OPTS="$JAVA_OPTS -XX:PermSize=64m -XX:MaxPermSize=128m -XX:+UseG1GC"

# Timezone and JVM file encoding
JAVA_OPTS="$JAVA_OPTS -Duser.timezone=UTC -Dfile.encoding=UTF8"

# solr.solr.home => solr home for this app instance
# host => hostname, defaults to first localhost address for.eg.: solr1.exmaple.org
# port => app server port no.
# hostContext => wepapp context name
# zkHost => ZooKeeper ensemble host names and its client port no.
# zkClientTimeout => ZooKeeper client timeout
SOLR_OPTS="-Dsolr.solr.home=/Users/jeeva/dc-1/solr/home1 -Dhost=solr1.example.org -Dport=7070 -DhostContext=solr -DzkClientTimeout=20000 -DzkHost=localhost:2181,localhost:2182,localhost:2183,localhost:2184,localhost:2185"

JAVA_OPTS="$JAVA_OPTS $SOLR_OPTS"
Incorporated notes from Flavio Pompermaier (via comment):
- It is important to specify in the solr.xml the host parameter and than in SOLR_OPTS too otherwise every node will advertise itself with its IP & hostname (127.0.0.1 & localhost). Since its defaults to first localhost address found
- If you keep solr configs in specific directory on ZooKeeper, kindly specify/append that directory name in the last node of the -DzkHost param. For e.g.: SOLR_OPTS will look like-
SOLR_OPTS="-Dsolr.solr.home=/Users/jeeva/dc-1/solr/home1 -Dhost=solr1.example.org -Dport=7070 -DhostContext=solr -DzkClientTimeout=20000 -DzkHost=localhost:2181,localhost:2182,localhost:2183,localhost:2184,localhost:2185/solr"
Step 5
Creating solr.xml for Solr Home
$ nano /Users/jeeva/dc-1/solr/home1/solr.xml
And place following lines into it and save solr.xml
Configuration for Solr v4.4.0 and above
<?xml version="1.0" encoding="UTF-8" ?>
<solr>

 <!-- Values are supplied from SOLR_OPTS env variavle in setenv.sh -->
  <solrcloud>
    <str name="host">${host:}</str>
    <int name="hostPort">${port:}</int>
    <str name="hostContext">${hostContext:}</str>
    <int name="zkClientTimeout">${zkClientTimeout:}</int>
    <bool name="genericCoreNodeNames">${genericCoreNodeNames:true}</bool>
  </solrcloud>

  <shardHandlerFactory name="shardHandlerFactory"
    class="HttpShardHandlerFactory">
    <int name="socketTimeout">${socketTimeout:0}</int>
    <int name="connTimeout">${connTimeout:0}</int>
  </shardHandlerFactory>
</solr>
Configuration up to Solr v4.3.1
<?xml version="1.0" encoding="UTF-8" ?>

<solr persistent="true">
	<!-- All of the attributes in cores after defaultCoreName only apply when running in SolrCloud mode. -->
	<cores adminPath="/admin/cores" defaultCoreName="collection1" host="${host:}" hostPort="${port:}"
		hostContext="${hostContext:}" zkClientTimeout="${zkClientTimeout:}">
	</cores>
</solr>
Now copy above solr.xml to home2 and home3
$ cp /Users/jeeva/dc-1/solr/home1/solr.xml /Users/jeeva/dc-1/solr/home2

$ cp /Users/jeeva/dc-1/solr/home1/solr.xml /Users/jeeva/dc-1/solr/home3
Step 6
Applying necessary permissions
$ chmod -R 755 /Users/jeeva/dc-1/

$ chmod +x /Users/jeeva/dc-1/tomcat*/bin/*.sh
Step 7
Updating tomcat server.xml for port number, shutdown port number. and comment out AJP connector (we don’t need it here). After modification don’t forget to save server.xml
Tomcat 1: /Users/jeeva/dc-1/tomcat1/conf/server.xml
- Port No. => 7070
- Shutdown port no. => 7005
- comment out Java AJP connector
Tomcat 2: /Users/jeeva/dc-1/tomcat2/conf/server.xml
- Port No. => 8080
- Shutdown port no. => 8005
- comment out Java AJP connector
Tomcat 3: /Users/jeeva/dc-1/tomcat3/conf/server.xml
- Port No. => 9090
- Shutdown port no. => 9005
- comment out Java AJP connector
Step 8
Start the Tomcat(s) servers one by one and then access any of the tomcat server for e.g. http://localhost:8080/solr; and be surprised to see the page similar to one shown below
Starting Tomcat(s)
$ /Users/jeeva/dc-1/tomcat1/bin/startup.sh

$ /Users/jeeva/dc-1/tomcat2/bin/startup.sh

$ /Users/jeeva/dc-1/tomcat3/bin/startup.sh
Screenshot – Solr Admin UI without Cores:

Now we are ready use Collections and CoreAdmin API’s to create our SolrCloud Collection.
Creating Collection, Shard(s), Replica(s) in SolrCloud
Let’s make use of Solr Collections and CoreAdmin API’s to create collection, shard(s), Replica(s) and replication factor. These handy API lets you control solr core for replica’s on specific Solr node.
Creation a Collection ‘europe-collection’ and passing following parameters
- action => CREATE
- collection name => europe-collection
- Number of Shards => 3
- Replicator Factor => 3 (no. of document copies in the collection)
- maxShardsPerNode => 3 (Since Solr v4.2, thanks to Ariel Lieberman)
Keenly notice to observe that we are not providing a collection.configName param because we have already linked the Solr configuration with Collection.
$ curl 'http://localhost:7070/solr/admin/collections?action=CREATE&name=europe-collection&numShards=3&replicationFactor=3&maxShardsPerNode=3'
Above command creates collection, shard in each SolrCloud node and Solr core in each Shard.
Creating Shard replica’s and distributing into 3 Solr Node(s) as per above design
We are specifically mentioning Shard Name and choosing particular Solr node for creating a replica
Shard 1 Replica’s –
$ curl 'http://localhost:7070/solr/admin/cores?action=CREATE&name=shard1-replica-1&collection=europe-collection&shard=shard1'

$ curl 'http://localhost:9090/solr/admin/cores?action=CREATE&name=shard1-replica-2&collection=europe-collection&shard=shard1'
Shard 2 Replica’s
$ curl 'http://localhost:8080/solr/admin/cores?action=CREATE&name=shard2-replica-1&collection=europe-collection&shard=shard2'

$ curl 'http://localhost:9090/solr/admin/cores?action=CREATE&name=shard2-replica-2&collection=europe-collection&shard=shard2'
Shard 3 Replica’s
$ curl 'http://localhost:8080/solr/admin/cores?action=CREATE&name=shard3-replica-1&collection=europe-collection&shard=shard3'

$ curl 'http://localhost:7070/solr/admin/cores?action=CREATE&name=shard3-replica-2&collection=europe-collection&shard=shard3'
We have achieved SolrCloud replica distribution in a fashion as shown in following diagram
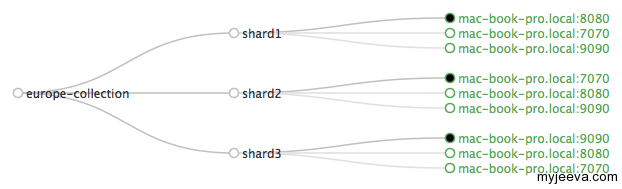
Now take a look at following solr.xml, and the newly created solr core configuration persisted in that.
$ nano /Users/jeeva/dc-1/solr/home1/solr.xml

$ nano /Users/jeeva/dc-1/solr/home2/solr.xml

$ nano /Users/jeeva/dc-1/solr/home3/solr.xml
Let’s Perform few documents indexing
Let us use the exampledocs shipped in Solr 4 artifcats for indexing and we will use each solr node we have created above.
$ cd /tmp/apache-solr-4.x.x/example/exampledocs/

mac-book-pro:exampledocs jeeva$ java -Durl=http://localhost:7070/solr/europe-collection/update -jar post.jar ipod_video.xml

mac-book-pro:exampledocs jeeva$ java -Durl=http://localhost:8080/solr/europe-collection/update -jar post.jar monitor.xml

mac-book-pro:exampledocs jeeva$ java -Durl=http://localhost:9090/solr/europe-collection/update -jar post.jar mem.xml
Querying an indexed document by hitting the following URL in the browser and the result would display 5 documents.
http://localhost:8080/solr/europe-collection/select?q=*:*
Exploring Newly Created SolrCloud Cluster Availability
As per above design we have evenly distributed Shard and it’s replica among 3 Solr Node(s). Hence we can expect good availability; because we have deployed the shard replica’s across Solr Node(s). Design used in this article is kind of startup; and this can be scaled further to deploy high availability clusters. Let’s test it.
Before checking the availability verify the number of documents in the europe-collection => http://localhost:9090/solr/europe-collection/select?q=*:*
And this results in total 5 documents in number.
Stop/Kill Tomcat 1 (running on port 7070) – Solr Node 1
$ /Users/jeeva/dc-1/tomcat1/bin/shutdown.sh
Query the Solr: http://localhost:9090/solr/europe-collection/select?q=*:*
This will provide 5 documents as search results.
Stop/Kill Tomcat 2 (running on port 8080) – Solr Node 2
$ /Users/jeeva/dc-1/tomcat2/bin/shutdown.sh
Query the Solr: http://localhost:9090/solr/europe-collection/select?q=*:*
This will still provide 5 documents as search results.
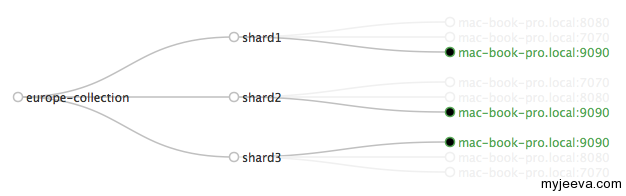
Take a look at Graph in the Solr Node 3 (http://localhost:9090/solr/#/~cloud), and find the following representation of cluster. Replica becomes leader and takes care of user queries.
Test it again with some indexing some more documents in Solr which is up and running, start the Solr Node 1 & Node 2 it will get sync with Node 3 in Recovery process of Solr cluster.
Your Journey Starts Here
I hope this article gives an idea & insight of deploying your SolrCloud Cluster (Single Collection) customized for your needs. All the best!
Please leave a comment if you have any queries :)